Preparing Artwork for Print: A Guide
September 22, 2015
You finished your artwork just on time, your nitpicky editor is finally satisfied with the design, and you’ve double, triple-checked that the file you’re about to submit has the required bleed. So you should be all set to send your file off to print, right? Well, no. Not exactly.
Ever since the advent of digital cameras and stock image libraries, the once small gap between onscreen graphics and final print results has widened into a chasm. Whether it’s books, brochures, bookmarks, business cards or banners, here are a few things to keep in mind when preparing artwork for print.
Calibrating Your Monitor
When you’re preparing files for print, first thing’s first: Before getting started on your work, make sure your screen is actually displaying the colors you need to ensure your project prints beautifully. Check out Calibrize and QuickGamma, two quick, free-access monitor calibration programs that will get you started on the right foot.
Color
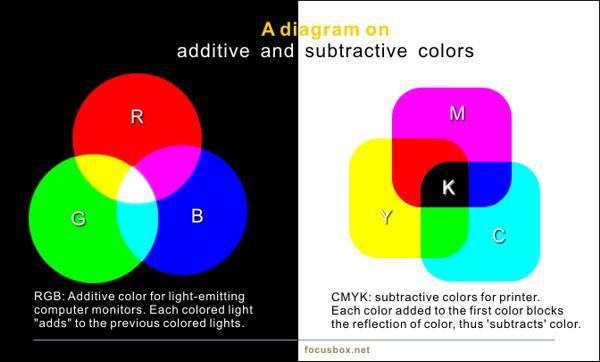
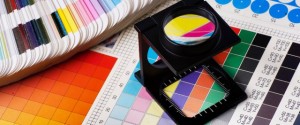
When preparing artwork for print, keep in mind that while your artwork will be sent off in CMYK (Cyan, Magenta, Yellow and Key) and printed in traditional 1, 2 or 4 CMYK color, it’s highly likely that some percentage of the design process will be done in RGB (for an explanation as to why CMYK is the preferred printing method, click here).
When starting out a new artwork project, keep in mind that there are two different routes you can take. You can either work in RGB throughout the design process and then convert your images, or convert images to CMYK straight from the beginning.
If you’re working with out-of-house graphics or corporate logos preset to specific CMYK values, we recommend working in CMYK color from the start. In which case, if you’re using any one of Adobe’s Photoshop, Illustrator or InDesign programs, head to Adobe Bridge, select Edit > Creative Suite Color Settings, and set “North America Prepress 2” as your standard color setting. Doing so will make sure that the combined CMYK values of all graphic components included in your file remain within the maximum values permitted by PrintPrint while also giving you freedom to use both RGB and CMYK images and files in the design process.
Using Photoshop
If you’re color-correcting in Photoshop in RGB, stay in RGB mode as long as you can before converting to CMYK. Proof your images before converting to CMYK both to ensure that they fit the intended color scheme and to avoid having to go back once you’ve switched to CMYK. To proof your images, go to View > Proof Colors.
Using Illustrator
If you start out in RGB mode, create your artwork in the RGB color space provided, using marks to set out where you’re going to drop in specific CMYK material later on. Once you complete the artwork in RGB, convert the elements into CMYK and then add the missing CMYK components.
Using InDesign
Like Illustrator, InDesign will let you work with a combination of both RGB and CMYK images, giving you the added benefit of being able to manipulate both types of files simultaneously throughout the design process. Go to View > Proof Colors to see the components in simulated RGB color before converting them to CMYK ahead of the printing process.
When you’re preparing files for print, remember that there is no one single “black.” For the highest quality printed results, render texts or gradients in process black. Large block areas, however, will look more lustrous using rich black, a black composed of 100% process black, 40% cyan, 10% magenta and 10% yellow.
Preparing Artwork for Print: Image Resolution
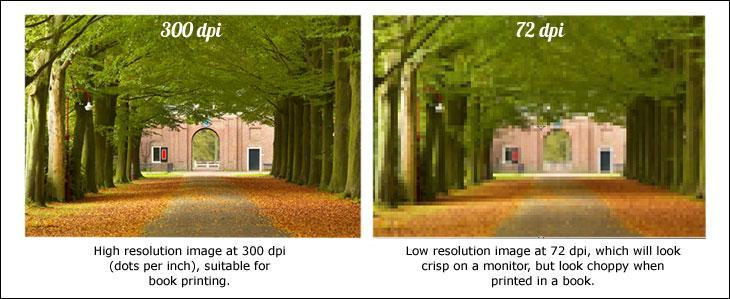
When preparing artwork for print, make sure your images are in the right resolution, size and format to ensure we produce your best artwork. As a rule, we advise our clients to make sure the images they use are at least 300 ppi (pixels per inch). We cannot guarantee optimum results when printing lower resolution images. Remember, resizing or rescaling images only reduces the resolution of your images and is best avoided altogether.
Instead, try editing your graphics with Photoshop’s Resampling Option, which simultaneously adjusts both the pixel dimensions and the size of your images, thereby ensuring your visual components remain in high resolution. Quark, InDesign and other programs have specific functions that will warn you if your image has lost resolution in the design process. Lastly, double-check that your images are saved in EPS, TIF or JPEG format at the aforementioned 300 ppi minimum.
Preparing Files for Print: Setting the Bleed
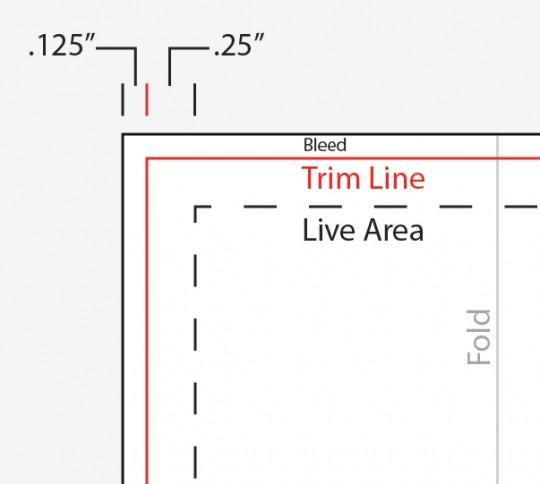
Bleed is a term used in printing to refer to the area beyond the trimmed edge of a sheet. If you want your artwork to be full-bleed (i.e. hug the edge of the document) be sure to extend your artwork into the bleed area during the design process. At PrintPrint, we use several different-sized bleeds depending on the type of product you want to print, with the standard being a minimum 1/8” bleed on each edge. Use clear cutter guides in the design process so that you can be sure to know how your artwork will look once it’s been trimmed and fitted to page. For more information on how to set clear ruler guides, visit this Adobe tutorial.
Preparing Files for Print: General Overview
Many people overlook tis all-important step when preparing files for print. Giving your file “the old once-over” just isn’t going to cut it, especially if you’re looking to produce high-quality prints. Make sure that your page numbers, titles and other style items are implemented consistently throughout your work. Look out for typos, double spaces, double tabs and misplaced full stops. You can’t monetize the value of a producing an error-free document.
Supplying Files For Final Print
Getting your file over to us at PrintPrint is the last hurdle you have to clear before we can begin printing. For detailed instructions on how to set up CorelDraw and Adobe Photoshop files for printing, please click here and here respectively. Make sure you save your file under a clear, descriptive name, including reference to the name of your project and company, and indication as to whether the file is a back or a front print. Files compressed using Acrobat, Stuffit or WinZip may be uploaded directly through our website.
PDF documents have become the industry-standard mode of submitting artwork over the last few years. On the other hand, exporting native Adobe, Corel or Quark files has the added benefit of allowing us to make subtle last-minute modifications to your work if required. To ensure that your files make it safe and sound to PrintPrint, double-check that you are using a supported version of the aforementioned programs. If you are using Quark, choose File > Collect for Output. For InDesign, select File > Package, and then compress before sending.
For any more tips on preparing artwork for print, feel free to contact us directly, and we’ll make sure your finished product looks as good in real life as it did on the screen.